With today's explosive database size requirements and the proliferation of SAN (Storage Area Network) and NAS (Network-Attached Storage) disk technologies, the system administrator and the DBA must manage hundreds to thousands of disks—sometimes just for one database. Thus the task of planning, initializing, allocating, managing and tuning so many disks becomes unwieldy. Capitulation is often inevitable, and many shops simply treat the disk storage farm as a black box, thus abstracting that complexity away from the database. The phrases "you don't need to know" and "just trust the hardware to handle it" are often given as justification. Frequently this black-box approach can lead to database I/O bottlenecks that are time-consuming to diagnose and remedy. For those few shops where the DBA does still in fact manage all those disks, the task consumes far too much precious time. Neither scenario should be generally acceptable, as both represent the extremes.
Oracle Database 10g's new ASM feature directly addresses these real-world scenarios by providing an effective and simple middle-ground solution. Now, instead of spending inordinate amounts of time managing disk complexities or abstracting it away from the database in the hopes that all is well, we can simply permit ASM to manage it all. We can now merely allocate disks to Oracle with preferences for striping and mirroring stated via templates, and let ASM manage the space—thus eliminating the need for traditional tools used to manage lots of disk space: a Logical Volume Manager (LVM), file systems, and the numerous commands necessary to manage both. Thus Linux database servers can now be deployed more easily and quickly for ever-growing database size requirements—and with far greater I/O efficiency than before. This article will examine the detailed differences on Linux between using an LVM with cooked files vs. ASM. For a more general ASM overview, I recommend reading the OTN article titled "Storage on Automatic" by Lannes Morris-Murphy.
Traditional Methods
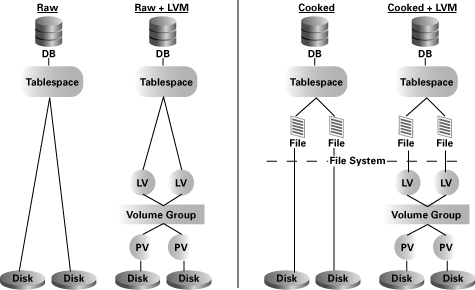
To begin, let's review how DBAs have historically allocated disk space to Oracle. We do this for two reasons. First and foremost, we want to ensure that we clearly see just how much simpler ASM makes the diagram. That simplicity will expose itself as "cleaner pictures," which translates to fewer steps to set up and fewer commands to manage. And second, we'll mention some scenarios in which each option might make sense. That will help us see how the newer technologies and all their options fit into the overall database storage picture. Figure 1 shows the traditional options.
| |
Figure 1
shows that there were essentially
two choices to be made: raw vs. cooked,
and
with or without an LVM.
These pictures could further be complicated because what is labeled a
"disk" might in fact be a pseudo-disk. For example, in an EMC disk
array, disks are referred to as "spindles" and can be subdivided into
hyper-disks. And in Linux, what we label as a "disk" is simply the
device reference—which might just be a partition of an actual
disk. To
keep things manageable and thus discussable, let's assume that a disk
is not to be subdivided: each disk in the diagram means a separate
physical disk drive.
Returning to our original
challenge (ever-bigger databases with lots and lots of disks), we often
had to choose an option from Figure 1
that would more easily scale to
hundreds or even thousands of disks. With such large numbers of disks,
the general consensus is to use an LVM. And, while on some operating
systems, raw devices are an attractive choice, I've found that raw
devices on Linux are not the best way to go. Of course, there are also
the extra management headaches associated
with using raw devices. So we can conclude that a cooked file system
with an LVM (right-most example) is really our best choice—and
therefore the scenario we'll compare against Oracle Database 10g
ASM.
The New Methods
Now let's look at Automatic Storage Management in more detail. Figure 2 shows both Oracle9i's Oracle Managed Files (OMF) and Oracle Database 10g ASM. Like many powerful Oracle features, there were incremental steps in delivering ASM
 |
In many respects, OMF was a first step at internalizing within the Oracle Database engine the concept of automatic file management. Even as just an incremental offering, however, it had some real usefulness. For those DBAs abstracting disk complexity away from the database (i.e., the extreme black-box scenario from my introduction above), they merely had to provide the database with a single file destination—via the DB_CREATE_FILE_DEST parameter. That parameter value can represent only a single file-system-based storage location—although it could be either a single pseudo-disk representing multiple physical disks hidden behind hardware RAID or a single logical volume combining numerous physical disks. Either way, Oracle9i Database automatically manages all the file-system files. The main disadvantages (besides the obvious single storage location) are that it does not work with raw devices and still requires using native operating-system-based file systems. Even the Oracle manuals suggest that OMF is limited as follows:
Now look again at Figure 2 and concentrate on ASM (right-most example). There is no need for either a LVM or file systems; there are simply disk groups under ASM management and available for tablespace consumption. And while the file management is again automatic as with OMF, it is now 100-percent internal. There are no file systems to mount via the /etc/fstab file and no files to access using operating system file commands like ls, cp, or tar. You now query the database to see all such information. Furthermore, ASM can stripe or mirror your data at the file level—vs. by disk with other methods. And Oracle automatically manages keeping everything fully mirrored or striped for you whenever disks within the disk groups are added, dropped, or fail, and all with the database completely online.
Oracle accomplishes this goal via new and highly efficient methods that are radically different than the simple arithmetic algorithms in use by many LVMs. And although you might make the point that there's an additional ASM Oracle instance required, the LVM-vs.-ASM example developed below will show that it's tiny, very easy to set up, and permits 100-percent effective, efficient, and automatic storage management—and can do so for all your database instances. So ASM will be shown to be easier to create and manage, as well as providing all the performance expected.
Easier to Set Up
ASM is just plain easier to set up than its file system and LVM counterpart. Let's assume we have a simple database to create—just the required tablespaces and one for user data. Let's also assume the following hardware and software constraints:
Figure 3 shows the relative complexities of each environment. And remember, this was a simple case for just four disk drives—now imagine doing that with thousands of drives.
 |
Now let's compare the actual steps to create the database in each environment. Note that in the LVM example I am purposely avoiding the handling of various overhead issues with all size settings in order to keep the example simple. But be warned: for optimal disk space usage, you'll have to tackle this issue as well. It's yet another example of complex storage planning and management issues that you can avoid by using ASM.
Here are the steps using cooked files with an LVM. (Note that the IDE disk drives are assumed to be the second-through-fifth drives in the example, hence the b-e device name designations of /dev/hdb through /dev/hde):
1. fdisk /dev/hdb
set its type to 0x8e (LVM partition)
2. fdisk /dev/hdc set its type to 0x8e
(LVM partition) )
3. fdisk /dev/hdd set its type to 0x8e
(LVM partition) )
4. fdisk /dev/hde set its type to 0x8e
(LVM partition) )
5. pvcreate /dev/hdb /dev/hdc /dev/hdd /dev/hde)
6. vgcreate VG01 /dev/hdb /dev/hdc /dev/hdd
/dev/hde)
7. lvcreate -L 4 G -i 4 -I 64 -n LV01 VG01)
8. lvcreate -L 8 G -i 4 -I 64 -n LV02 VG01)
9. lvcreate -L 8 G -i 4 -I 64 -n LV03 VG01)
10. -L 60 G -i 4 -I
64 -n LV04 VG01)
11. mkfs -t ext3
/dev/VG01/LV01)
12. mkfs -t ext3
/dev/VG01/LV02)
13. mkfs -t ext3
/dev/VG01/LV03)
14. mkfs -t ext3
/dev/VG01/LV04)
15. mount
/dev/VG01/LV01 /home/oracle/oradata/LVMDB/system)
16. mount
/dev/VG01/LV02 /home/oracle/oradata/LVMDB/undo)
17. mount
/dev/VG01/LV03 /home/oracle/oradata/LVMDB/temp)
18. mount
/dev/VG01/LV04 /home/oracle/oradata/LVMDB/user1)
19. edit /etc/fstab
and add the new mount point entries)
20. Create
initLVMDB.ora file)
•
INSTANCE_TYPE = RDBMS)
21. SQL Plus
connect as SYSDBA for SID=LVMDB)
22. STARTUP NOMOUNT
PFILE=initLVMDB.ora)
23. CREATE SPFILE
FROM PFILE=initLVM.ora)
24. Create Oracle database and user tablespace
using SQL code. [See Listing 1.]
create database LVMDB
controlfile reuse
logfile         '/home/oracle/oradata/LVMDB/redo_log01.dbf' size 16M,
                '/home/oracle/oradata/LVMDB/redo_log02.dbf' size 16M
datafile        '/home/oracle/oradata/LVMDB/system/system01.dbf' size 2 G
sysaux datafile '/home/oracle/oradata/LVMDB/system/sysaux01.dbf' size 2 G
default temporary tablespace temp
tempfile        '/home/oracle/oradata/LVMDB/temp/temp01.dbf' size 2 G,
                '/home/oracle/oradata/LVMDB/temp/temp02.dbf' size 2 G,
                '/home/oracle/oradata/LVMDB/temp/temp03.dbf' size 2 G,
                '/home/oracle/oradata/LVMDB/temp/temp04.dbf' size 2 G
extent management local uniform size 64k
undo tablespace undo
datafile        '/home/oracle/oradata/LVMDB/undo/undo01.dbf' size 2 G,
                '/home/oracle/oradata/LVMDB/undo/undo02.dbf' size 2 G,
                '/home/oracle/oradata/LVMDB/undo/undo03.dbf' size 2 G,
                '/home/oracle/oradata/LVMDB/undo/undo04.dbf' size 2 G;

create tablespace USER
datafile        '/home/oracle/oradata/LVMDB/user1/user01.dbf' size 2 G,
                '/home/oracle/oradata/LVMDB/user1/user02.dbf' size 2 G,
                '/home/oracle/oradata/LVMDB/user1/user03.dbf' size 2 G,
                '/home/oracle/oradata/LVMDB/user1/user04.dbf' size 2 G,
                '/home/oracle/oradata/LVMDB/user1/user05.dbf' size 2 G,
                '/home/oracle/oradata/LVMDB/user1/user06.dbf' size 2 G,
                '/home/oracle/oradata/LVMDB/user1/user07.dbf' size 2 G,
                '/home/oracle/oradata/LVMDB/user1/user08.dbf' size 2 G,
                '/home/oracle/oradata/LVMDB/user1/user09.dbf' size 2 G,
                '/home/oracle/oradata/LVMDB/user1/user10.dbf' size 2 G,
                '/home/oracle/oradata/LVMDB/user1/user11.dbf' size 2 G,
                '/home/oracle/oradata/LVMDB/user1/user12.dbf' size 2 G,
                '/home/oracle/oradata/LVMDB/user1/user13.dbf' size 2 G,
                '/home/oracle/oradata/LVMDB/user1/user14.dbf' size 2 G,
                '/home/oracle/oradata/LVMDB/user1/user15.dbf' size 2 G,
                '/home/oracle/oradata/LVMDB/user1/user16.dbf' size 2 G,
                '/home/oracle/oradata/LVMDB/user1/user17.dbf' size 2 G,
                '/home/oracle/oradata/LVMDB/user1/user18.dbf' size 2 G,
                '/home/oracle/oradata/LVMDB/user1/user19.dbf' size 2 G,
                '/home/oracle/oradata/LVMDB/user1/user20.dbf' size 2 G,
                '/home/oracle/oradata/LVMDB/user1/user21.dbf' size 2 G,
                '/home/oracle/oradata/LVMDB/user1/user22.dbf' size 2 G,
                '/home/oracle/oradata/LVMDB/user1/user23.dbf' size 2 G,
                '/home/oracle/oradata/LVMDB/user1/user24.dbf' size 2 G,
                '/home/oracle/oradata/LVMDB/user1/user25.dbf' size 2 G,
                '/home/oracle/oradata/LVMDB/user1/user26.dbf' size 2 G,
                '/home/oracle/oradata/LVMDB/user1/user27.dbf' size 2 G,
                '/home/oracle/oradata/LVMDB/user1/user28.dbf' size 2 G,
                '/home/oracle/oradata/LVMDB/user1/user29.dbf' size 2 G,
                '/home/oracle/oradata/LVMDB/user1/user30.dbf' size 2 G
extent management local uniform size 64k;
Now simply imagine that you'll need dozens of such user tablespaces, each with lots and lots of data files. It's not hard to see why this example does not scale well. Keeping track of all the tablespaces, data files, logical volumes, physical volumes, and actual disk drives (for finding hot spots) is just too difficult.
Now here's the much simpler ASM example:
1. Create initASM.ora file
•
INSTANCE_TYPE =
OSM
2. SQL Plus connect as SYSDBA for SID=ASM
3. STARTUP NOMOUNT PFILE=initASM.ora
4. CREATE SPFILE FROM PFILE=initASM.ora
5. CREATE DISKGROUP dgroup1 EXTERNAL REDUNDANCY
DISK
'/dev/hdb','/dev/hdc','/dev/hdd','/dev/hde'
6. Create initASMDB.ora file
•
INSTANCE_TYPE =
RDBMS
• DB_CREATE_FILE_DEST
=
'+dgroup1'
7. SQL Plus connect as SYSDBA for SID=ASMDB
8. STARTUP NOMOUNT PFILE=initASMDB.ora
9. Create Oracle database and user tablespace
using SQL [Listing 2.]
create database ASMDB
controlfile reuse
logfile         '+dgroup1' size 16 M
datafile        '+dgroup1' size 2 G
sysaux datafile '+dgroup1' size 2 G
default temporary tablespace temp
tempfile        '+dgroup1' size 8 G
undo tablespace undo
datafile        '+dgroup1' size 8 G;

create tablespace USER_LOCAL
datafile        '+dgroup1' size 60 G;
And that's the syntax if we still want to explicitly control the data allocation sizes (which really is no longer a concern as we're now working at the disk level). Thus we really could just let Oracle handle all the internal space needs and issue the much simpler syntax:
create database ASMDB;
Not only is this syntax much shorter and thus easier to read, but note that we even got our redo logs created in our striped disk group. (In the prior example they had just been placed on the file system.) The main point is that the process of laying out the storage and creating the database is just so much simpler that if you're managing lots and lots of disk drives (i.e., SAN or NAS) that you can't go wrong with upgrading to Oracle Database 10g for ASM alone.
Easier to Change
Of course you only create the database once, so you might argue that the savings shown above are not reason enough to undertake any changes. So now let's examine what would happen in each scenario if we add four disks. This is where ASM really shines.
Let's assume that our single USER tablespace is nearly full, containing just 10 tables and 10 indexes, where each table consumes 4GB and each index consumes 2GB. If we now need to create another table and index, we don't have enough room. So we are given four more disks identical to the first four to add to our storage design in order to accommodate additional space requests. In other words, we're going to add 80GB to our single USER tablespace. Sounds easy enough, right?
In the LVM example, we have three primary options:
[Note: Since we're assuming that all 80GB is to be dedicated to the USER tablespace, there is no need to create more than a single new Logical Volume for the first two options.]
Most people will choose the third option because we're merely trying to add space to our existing storage design. The steps to implement that choice are shown below.
alter tablespace USER
add datafile    '/home/oracle/oradata/LVMDB/user2/user01.dbf' size 2 G,
                '/home/oracle/oradata/LVMDB/user2/user02.dbf' size 2 G,
                '/home/oracle/oradata/LVMDB/user2/user03.dbf' size 2 G,
                '/home/oracle/oradata/LVMDB/user2/user04.dbf' size 2 G,
                '/home/oracle/oradata/LVMDB/user2/user05.dbf' size 2 G,
                '/home/oracle/oradata/LVMDB/user2/user06.dbf' size 2 G,
                '/home/oracle/oradata/LVMDB/user2/user07.dbf' size 2 G,
                '/home/oracle/oradata/LVMDB/user2/user08.dbf' size 2 G,
                '/home/oracle/oradata/LVMDB/user2/user09.dbf' size 2 G,
                '/home/oracle/oradata/LVMDB/user2/user10.dbf' size 2 G,
                '/home/oracle/oradata/LVMDB/user2/user11.dbf' size 2 G,
                '/home/oracle/oradata/LVMDB/user2/user12.dbf' size 2 G,
                '/home/oracle/oradata/LVMDB/user2/user13.dbf' size 2 G,
                '/home/oracle/oradata/LVMDB/user2/user14.dbf' size 2 G,
                '/home/oracle/oradata/LVMDB/user2/user15.dbf' size 2 G,
                '/home/oracle/oradata/LVMDB/user2/user16.dbf' size 2 G,
                '/home/oracle/oradata/LVMDB/user2/user17.dbf' size 2 G,
                '/home/oracle/oradata/LVMDB/user2/user18.dbf' size 2 G,
                '/home/oracle/oradata/LVMDB/user2/user19.dbf' size 2 G,
                '/home/oracle/oradata/LVMDB/user2/user20.dbf' size 2 G,
                '/home/oracle/oradata/LVMDB/user2/user21.dbf' size 2 G,
                '/home/oracle/oradata/LVMDB/user2/user22.dbf' size 2 G,
                '/home/oracle/oradata/LVMDB/user2/user23.dbf' size 2 G,
                '/home/oracle/oradata/LVMDB/user2/user24.dbf' size 2 G,
                '/home/oracle/oradata/LVMDB/user2/user25.dbf' size 2 G,
                '/home/oracle/oradata/LVMDB/user2/user26.dbf' size 2 G,
                '/home/oracle/oradata/LVMDB/user2/user27.dbf' size 2 G,
                '/home/oracle/oradata/LVMDB/user2/user28.dbf' size 2 G,
                '/home/oracle/oradata/LVMDB/user2/user29.dbf' size 2 G,
                '/home/oracle/oradata/LVMDB/user2/user30.dbf' size 2 G,
                '/home/oracle/oradata/LVMDB/user2/user31.dbf' size 2 G,
                '/home/oracle/oradata/LVMDB/user2/user32.dbf' size 2 G,
                '/home/oracle/oradata/LVMDB/user2/user33.dbf' size 2 G,
                '/home/oracle/oradata/LVMDB/user2/user34.dbf' size 2 G,
                '/home/oracle/oradata/LVMDB/user2/user35.dbf' size 2 G,
                '/home/oracle/oradata/LVMDB/user2/user36.dbf' size 2 G,
                '/home/oracle/oradata/LVMDB/user2/user37.dbf' size 2 G,
                '/home/oracle/oradata/LVMDB/user2/user38.dbf' size 2 G,
                '/home/oracle/oradata/LVMDB/user2/user39.dbf' size 2 G,
                '/home/oracle/oradata/LVMDB/user2/user40.dbf' size 2 G;
Not only is this example very long; it has several problems as well. First, online file system resizing is a very tricky business. The author of the ext2online utility states that "resizing a mounted file system is inherently dangerous and may corrupt file systems." And the ext2online utility can only enlarge a mounted file system; to shrink or enlarge file systems one would use ext2resize instead—which only works on unmounted file systems. Of course that would require taking the tablespace offline.
The LVM approach has some not-so-obvious drawbacks as well. We very likely expected that this solution would result in our data being striped across all eight of our drives—not true. While we can add space to a Logical Volume, we cannot change its striping nature on Linux (although some UNIX LVMs do provide such capabilities). So our 10 old tables and 10 old indexes are striped across drives b-e, while our new table and index are striped across drives f-i (because the USER tablespace was already full, new objects will be created in the new space). Even if we exported the tablespace objects, dropped them, coalesced the tablespace, and then imported them back into the tablespace, the Logical Volume is still set for four-way striping. We'd have to manually do the following if we really wanted eight-way striping:
That's where ASM steps in and makes life easy. The steps are shorter:
Furthermore, ASM automatically rebalances both its striping and mirroring of a disk group whenever disks are added, dropped, or fail—and all with the database completely online. Therefore Oracle automatically takes care of keeping all of your objects fully striped. That's why ASM can make the claim that it provides near-optimal I/O balancing without any manual tuning. It simply internalizes and automates that which DBAs have been doing manually for years—trying to eliminate hot spots by spreading things across as many drives as possible. Note that you can control when and how Oracle performs that rebalancing via the OSM_POWER_LIMIT and other parameters (but that deserves an article on its own).
Some Performance, Too...
Oracle Database 10g's mantra is simpler, more automated database management. All of the above exemplifies why for some many shops ASM alone might justify an upgrade to Database 10g. But this article would be incomplete without some examples comparing the relative performance of the LVM-vs.-ASM scenarios. While we are eliminating the LVM and file system, we are still nonetheless utilizing more Oracle technology to do essentially much of the same thing. So initial expectations are to see fairly similar or slightly better performance—with the advantages once again being far greater simplicity to create and manage.
Here are some relative results for consideration:
| ASM over LVM | |
| Populate an 80GB database | 11% faster |
| Build indexes for the database | 9% faster |
| 200-user concurrent access (OLTP) | 5% faster |
While these results are not
earth-shattering, roughly a 10-percent improvement from a feature that
makes the DBA's life easier is not a bad return on investment for the
cost of doing an upgrade. And I'm optimistic that when Oracle Database
10g releases as production-ready, those numbers might improve.