Using Autoupgrade for 12c to 19c Migration


    AutoUpgrade enables customers to upgrade one or many Oracle databases at the command-line with a single command and a single configuration file. AutoUpgrade will run the preupgrade tasks, perform automated fixups where needed, execute the database upgrade, and finish by taking care of post-upgrade tasks. It includes automatic retry and fallback, the possibility to schedule upgrades for future points in time, and the ability to set, change or remove initialization parameters as desired. 

    Database can directly be upgraded to 19c from below releases: 11.2.0.3, 11.2.0.4, 12.1.0.1, 12.1.0.2, 12.2.0.1 and 18


    Recommended Steps


    Step 1: Take full backup of your database with controlfile and spfile. So that if anything goes wrong during upgrade, you can always restore your database.


    run {

    allocate channel demtest_backup_disk1 type disk format 'C:\temp\full_backup_fidelio/%d_%U';

    allocate channel demtest_backup_disk2 type disk format 'C:\temp\full_backup_fidelio/%d_%U';

    allocate channel demtest_backup_disk3 type disk format 'C:\temp\full_backup_fidelio/%d_%U';

    allocate channel demtest_backup_disk4 type disk format 'C:\temp\full_backup_fidelio/%d_%U';

    backup incremental level 0 database;

    backup current controlfile;

    release channel demtest_backup_disk1;

    release channel demtest_backup_disk2;

    release channel demtest_backup_disk3;

    release channel demtest_backup_disk4;

    }


    Step 2:  Pre-Upgrade actions.

    • As SYS User, Empty the recycle bin
      • PURGE DBA_RECYCLEBIN;
    • Check for INVALID objects in SYS and SYSTEM
      • col owner format a15
      • col object_name format a45
      • col object_type format a15
      • select owner, object_name, object_type from dba_objects where owner in ('SYS','SYSTEM') and status='INVALID' order by owner,object_type;

    Recompile invalids using utlrp.sql

    SQL> @$ORACLE_HOME/rdbms/admin/utlrp.sql


    • Check for duplicate objects in SYS and SYSTEM
      • SELECT object_name, object_type, subobject_name, object_id
        FROM dba_objects
        WHERE object_name||object_type in
           (SELECT object_name||object_type  
            FROM dba_objects
            WHERE owner = 'SYS')
        AND owner = 'SYSTEM'
        AND object_name NOT in ('AQ$_SCHEDULES','AQ$_SCHEDULES_PRIMARY','DBMS_REPCAT_AUTH','DBMS_REPCAT_AUTH') ;


    • Step 3: Gather Dictionary Statistics.

    SQL> EXEC DBMS_STATS.GATHER_DICTIONARY_STATS;


    Actions to perform


    • Step 1: Define Environment Variables

    Windows Example

    set ORACLE_HOME=D:\oracle\product\19.3.0\dbhome_1

    set SQLPATH=.;%SQLPATH%

    set JAVA_HOME=%ORACLE_HOME%\jdk\bin

    set PATH=%ORACLE_HOME%\bin;%JAVA_HOME%;%PATH%


    Linux Example

    export ORACLE_HOME=/u01/app/oracle/product/19.0.0/dbhome_1

    export PATH=$PATH:$ORACLE_HOME/jdk/bin

    export JAVA_HOME=$ORACLE_HOME/jdk/bin


    • Step 2: Get the latest autoupgrade.jar java file

    Get the latest autoupgrade.jar java file from Doc ID 2485457.1 and place it under under your 19c directory: $ORACLE_HOME/rdbms/admin 


    • Step 3: Check that you have Java 8 or newer
      $ORACLE_HOME/jdk/bin/java -version

    D:\oracle\product\19.0.0\dbhome_1\jdk/bin/java -version


    Step 4: Create the config file

    Create a directory to hold all upgrade config and log files.


    mkdir C:\temp\19c-autoupg

    cd C:\temp\19c-autoupg


    Create an autoupgrade Sample Configuration File

    D:\oracle\product\12.2.0\dbhome_1\jdk\bin\java -jar D:\oracle\product\19.3.0\dbhome_1\rdbms\admin\autoupgrade.jar -create_sample_file config


    $JAVA_HOME/java -jar $ORACLE_HOME/rdbms/admin/autoupgrade.jar -create_sample_file config


    Create Config File

    notepad C:\temp\19c-autoupg\fidelio_db_config.cfg


    Windows Example:

    global.autoupg_log_dir=C:\temp\19c-autoupg\

    # Database fidelio

    upg1.dbname=fidelio

    upg1.source_home=D:\oracle\product\12.2.0\dbhome_1

    upg1.target_home=D:\oracle\product\19.0.0\dbhome_1

    upg1.start_time=NOW

    upg1.sid=fidelio

    upg1.log_dir=C:\temp\19c-autoupg\

    upg1.target_version=19

    upg1.upgrade_node=localhost

    upg1.run_utlrp=yes

    upg1.timezone_upg=yes

    ## This is required for databases in NOARCHIVELOG mode, to skip restore point creation.

    ## be aware that this means there will be no fallback plan if the upgrade fails

    upg1.restoration=no 


    Linux Example:

    global.autoupg_log_dir=/home/oracle/upgrade_to_19c

    # Database fidelio

    upg1.dbname=fidelio2

    upg1.source_home=/u01/app/oracle/product/12.2.0.1/db_1

    upg1.target_home=/u01/app/oracle/product/19.0.0/dbhome_1

    upg1.start_time=NOW

    upg1.sid=fidelio2

    upg1.log_dir=/home/oracle/upgrade_to_19c

    upg1.target_version=19

    upg1.upgrade_node=localhost

    upg1.run_utlrp=yes

    upg1.timezone_upg=yes

    ## This is required for databases in NOARCHIVELOG mode, to skip restore point creation.

    ## be aware that this means there will be no fallback plan if the upgrade fails

    upg1.restoration=no


    Step 5 : Copy listener.ora, sqlnet.ora and tnsnames.ora to 19c Folder

    Copy D:\oracle\product\12.2.0\dbhome_1\network\admin\*.ora D:\oracle\product\19.3.0\dbhome_1\network\admin


    cp /u01/app/oracle/product/12.2.0.1/db_1/network/admin/*.ora $ORACLE_HOME/network/admin


    Step 6: Analyze the database

    The Four Modes of AutoUpgrade processing described in Oracle Docs (ANALYZE, FIXUP, DEPLOY & UPGRADE).

    • ANALYZE : This mode perform pre-checks on source database to see if it is ready for upgrade. It will only ANALYZE the source database and will to perform any changes.
    • FIXUPS : This mode performs the checks that it also performs while in Analyze mode and after completing these checks, AutoUpgrade then performs all automated fixup tasks that are required to fix the earlier release source database before before the upgrade is commenced.
    • DEPLOY : This mode will perform actual upgrade of the source database. If needed it can also perform fixups on database.
    • UPGRADE : Upgrade mode enables you to upgrade the target Oracle Home in cases where you do not have access to source Oracle Home.

    You can run auto upgrade directly in DEPLOY mode without running ANALYZE and FIXUPS mode. But if you do not want to take chances to see unforseen abortion of upgrade, you better run it in ANALYZE and FIXUPS mode before running it in DEPLOY mode.


    Machine
                generated alternative text:AutoUpgrade Processing Mode
                Stages The stages that Autoupgrade runs for an upgrade
                job depends on the processing mode that you select.
                ANALYZE SETUP PREuPGRADE PRECHECKS G PR Job xyz DRAIN
                DBUPGRAOE POSTCHECKS POSTFIXUPS POSTUPGRADE Description
                of the illustration autoupgrade-options.eps There are
                four Autoupgrade modes. For each mode, Autoupgrade steps
                are performed in sequence. Note the differences in steps
                for each mode Analyze Mode: Setup, Prechecks. Fixups
                Mode: Setup, Prechecks, and Prefixups. Deploy Mode:
                Setup, Preupgrade, Prechecks, guaranteed restore point
                (GRP), Prefixups, Drain, DB (database) Upgrade.
                Postchecks, and Postupgrade. You can run your Own
                scripts before the upgrade (Preupgrade stage) Or after
                the upgrade (Postupgrade stage), Or both before and
                after the upgrade. Uparade Mode: Setup, DB (database)
                Lloarade„ Postchecks, and Postfixu


    Autoupgrade Analyze mode checks your database to see if it is ready for the upgrade. This will reads data from the database and does not perform any updates.


    Execute autoupgrade in analyze mode with the below syntax,


    Windows Example

    %JAVA_HOME%\java -jar %ORACLE_HOME%\rdbms\admin\autoupgrade.jar -config fidelio_db_config.cfg -mode ANALYZE


    Linux Example

    $JAVA_HOME/java -jar $ORACLE_HOME/rdbms/admin/autoupgrade.jar -config fidelio_db_config.cfg -mode ANALYZE


    Machine generated alternative text:
                HOME%Xjava -jar %ORACLE
                HOME%XrdbmsXadminXautoupgrade.jar NALYZE utoUpgrade tool
                launched with default options Processing config file I
                Starting AutoUpgrade execution I 1 databases will be
                analyzed Type help' to list console commands -config
                Fidelio db config. txt - mode


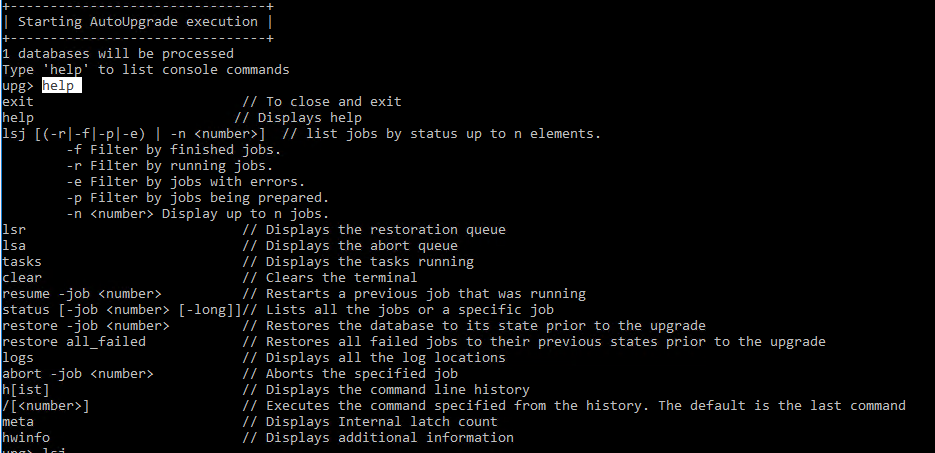
    We can monitor, manage and control the jobs from the autoupgrade console. Example:


    lsj – to list the jobs

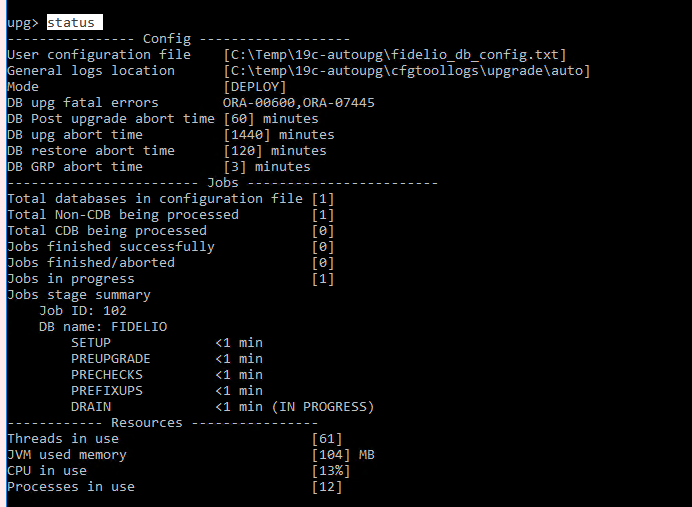
    status – to show the job status. Example:  status -job 100

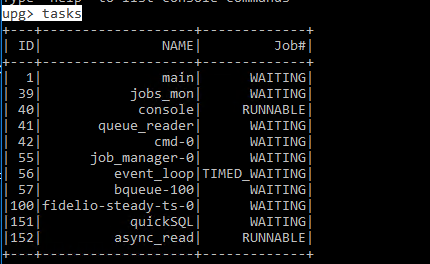
    tasks – shows the tasks executing


    Check Tasks

    Machine generated alternative text:
                I IDI 1 411 1 421 NAME I main I jobs monl console I
                queue readerl cmd -el job manager-al Job* I WAITING I
                WAITINGI RUNNABLEI WAITINGI WAITINGI WAITINGI event
                loopl TIMED WAITINGI bqueue-løøl 1101 fidelio-
                steady-ts-øl WAITINGI WAITINGI WAITINGI RUNNABLEI 11511
                11521 quickSQL I async read I


    Check Job Status

    Machine generated alternative text:
                upo I Job*lDB NAMEI STAGE I OPERATIONI STATUSI START
                TIMEI UPDATEDI MESSAGE I I 38/791 Total jobs 1


    All Analyze logs are created under autoupg_log_dir


    Once the AutoUpgrade finished in ANALYZE mode, you can view an HTML output of script under specified upg1.log_dir which is C:\temp\19c-autoupg in our case.

    Location of HTML output file is 100/prechecks/ under above specified directory. Name would be <dbname>_preupgrade.html which is 

    C:\Temp\19c-autoupg\fidelio\100\prechecks\fidelio_preupgrade.html in our case.

    You can also verify the precheck status by looking at specified global.autoupg_log_dir. Under this directory, navigate to cfgtoollogs/upgrade/auto/status under global.autoupg_log if you see <dbname>_prechecks.success, you’re good to proceed with DEPLOY mode.


    We can review the html file (fidelio_preupgrade.html) which will list all precheck Errors, warnings and recommendations:


    Machine generated alternative text:
                ORACLE' Date: Fri Mar 05 EST 2021 | DB compatible: I DB
                version: 12.20.1.0 | operating system: Windows server
                2016 severity INFO stage PRECHECKS fidelio Database
                fidelio PreChecks Info(3) PostChecks Waming(3)
                PostChecks Recommend(2) PostChecks Info(l) fidelio
                CheckName: MANDATORY UPGRADE CHANGES Fixup Available:
                YES Mandatory changes are applied automatically the
                during_upgrade_pfile dbname_ora file Some ofthese
                changes maybe present in the aner upgrade_pfile
                dbname.ora file. The during_upgrade_pfile dbname.ora
                used to start the database upgrade mode. The after
                upgrade_pfile dbname_ora is used to start the database
                once the upgrade has completed successfully Mandatory
                changes are required to perform the upgrade. These
                changes are implemented in the during_ and aner
                upgrade_pfile dbname_ora files local listener-remove'
                cluster database—FALSE' CheckName: RMAN RECOVERY VERSION
                FixUp Available NO Parameter Severity: INFO stage:
                PRECHECKS Check the Oracle Backup and Recovery Users
                Guide for information on how to manage an RMAN recovery
                catalog schema. It is good practice to have the catalog
                schema the same or higher version than the RMAN client
                version you are usilW If you are using a version of the
                recovery catalog schema that older than that required by
                the RMAN client version, then you must upgrade the
                catalog schema


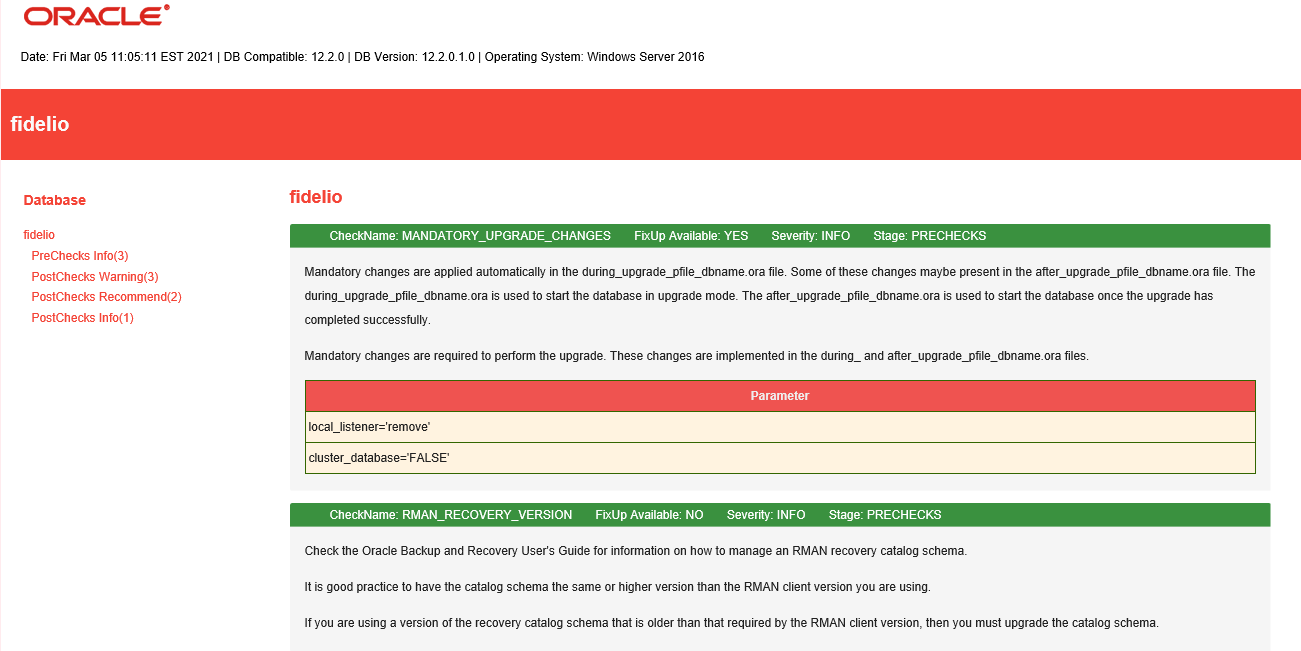
    In the report you will see different severity levels: INFO , WARNING , ERROR , RECOMMEND

    Of course “ERROR” indicates that you need Fix the issue before attempting to upgrade the database.


    Step 7: Start Process


    If there are no errors, you can execute the DEPLOY mode, otherwise is better to execute the FIXUPS Mode to make corrections.


    So in this example, we didn't have any critical warnings, but we will use the FIXUP Mode for demonstration purposes:

    Windows Example

    %JAVA_HOME%\java -jar %ORACLE_HOME%\rdbms\admin\autoupgrade.jar -config fidelio_db_config.cfg -mode FIXUPS


    Linux Example

    $ORACLE_HOME/jdk/bin/java -jar $ORACLE_HOME/rdbms/admin/autoupgrade.jar -config fidelio_db_config.cfg -mode FIXUPS


    Once the corrections are made (again, this was not necessary in our example), we can execute the DEPLOY Mode. Autoupgrade Deploy mode performs the actual upgrade of the database from preugrade source database analysis to post-upgrade checks.

    Windows Example

    %JAVA_HOME%\java -jar %ORACLE_HOME%\rdbms\admin\autoupgrade.jar -config fidelio_db_config.cfg -mode DEPLOY


    Linux Example

    $JAVA_HOME/java -jar $ORACLE_HOME/rdbms/admin/autoupgrade.jar -config fidelio_db_config.cfg -mode DEPLOY


    As soon as you run it in DEPLOY mode, consider reviewing the log under C:\Temp\19c-autoupg\FIDELIO\<job number>\dbupgrade\autoupgrade*fidelio.log

    Or even better, use the new tools to monitor:


    Machine generated alternative text:
                I Starting AutoUpgrade execution I 1 databases will be
                processed Type ' hel to list console commands upo exit
                help // To close and exit // Displays help Isj
                ((-rl-fl-pl-e) I -n (number)) // list jobs by status up
                to n elements. Filter by finished jobs. Filter by
                running jobs. Filter by jobs with errors . Filter by
                jobs being prepared n (number) Display up to n jobs . -p
                Isr Isa asks clear resume -job (number) status L -job
                (number) restore -job (number) restore all failed logs
                abort -job (number) htist) / (number) hwinfo Displays
                the restoration queue Displays the abort queue Displays
                the tasks running Clears the terminal Restarts a
                previous job that was running Lists all the jobs or a
                specific job Restores the database to its state prior to
                the upgrade Restores all failed jobs to their previous
                states prior to the upgrade Displays all the log
                locations Aborts the specified job Displays the command
                line history Executes the command specified from the
                history Displays Internal latch count Displays
                additional information The default is the last command


    List running jobs

    Machine generated alternative text:
                upo IJob#lDB NAMEI STAGE I OPERATIONI STATUSI START
                TIMEI UPDATEDI MESSAGE I 1 Reportsl Total jobs 1


    Machine generated alternative text:
                upo Isj I Job*lDB NAME ISTAGEIOPERATIONI STATUSI START
                TIME-I UPDATEDI MESSAGE I | 181 11:11 Windows service
                Total jobs 1


    Machine generated alternative text:
                upo I Job*lDB NAMEI STAGE I OPERATIONI STATUSI START
                TIME-I UPDATEDIMESSAGEI | 181 11:11 Total jobs 1


    Machine generated alternative text:
                upo IJob#lDB NAMEI STAGE I OPERATIONI STATUSI START
                TIMEI UPDATEDI MESSAGE I


    Machine generated alternative text:
                upo Isj I Job*lDB NAMEI STAGE I OPERATIONI STATUSI START
                TIME-I UPDATEDI Total jobs 1 MESSAGE I


    Name & Status of all tasks.

    Machine generated alternative text:
                upo I IDI 1 661 1 681 NAME I main I Job* I WAITINGI
                event loopl TIMED WAITINGI console I queue readerl cmd
                -el job manager-el bqueue- 182 | RUNNABLEI WAITINGI
                WAITINGI WAITINGI WAITINGI WAITINGI WAITINGI RUNNABLEI 1
                cmp-øl 13871 13881 quickSQL I async read I


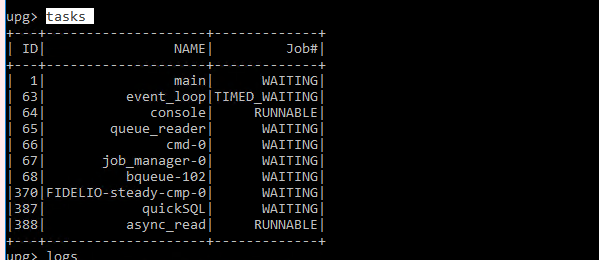
    Get location of logs

    Machine generated alternative text:
                upo utoupgrade logs folder (C:
                Xtempugc-autoupgxcfgtoollogsxupgradexauto) logs folder
                (FIDELIO J (C: XtempX1gc-autoupgXFIDELIO)


    • Status of AutoUpgrade

    Machine generated alternative text:
                upo Config User configuration file eneral logs location
                ode DB upg fatal errors (C: XTempX1gc-autoupgXfide1io db
                config. txt) (C : Xtempx lgc- autoupgx cfgtool logs
                auto) (DEPLOY) ORA -aesee,ORA-B744S DB Post upgrade
                abort time 168 J minutes DB upg abort time DB restore
                abort time DB GRP abort time 1144B) minutes 112B)
                minutes (3) minutes Jobs file (IN PROGRESS) 161) 1184 J
                MB 113%) 112) Total databases in configuration Total
                Non-CDB being processed Total CDB being processed Jobs
                finished successfully ml n ml n ml n ml n ml n Jobs
                finished/ aborted Jobs in progress Jobs stage summary
                Job ID: 182 DB name: FIDELIO SETUP PREUPGRADE PRECHECKS
                PREFIXUPS DRAIN Resources - Threads in use 3VM used
                memory CPU in use Processes in use (1 (1 (1 (1 (1


    And here is the end of the script


    Machine generated alternative text:
                upg» Job 101 completed Final Summary - Number of
                databases Jobs finished successfully Jobs failed Jobs
                pending JOBS FINISHED SUCCESSFULLY Job 101 for fidel i02


    After this step, you will have your DB running under 19c !!!


    More information here:

    https://oracle-blog.com/upgrade-to-oracle-19c-using-autoupgrade-utility/

    https://mikedietrichde.com/hol-19c-upgrade/

    https://mikedietrichde.com/2020/08/03/oracle-autoupgrade-between-two-servers/

    https://mikedietrichde.com/2020/08/04/oracle-autoupgrade-between-two-servers-and-plugin/


    How to Upgrade with AutoUpgrade and Data Guard

    From <https://dohdatabase.com/2021/01/05/how-to-upgrade-with-autoupgrade-and-data-guard/>


    How to Upgrade a Single PDB

    From <https://dohdatabase.com/2021/01/07/how-to-upgrade-a-single-pdb/>